Vue生命周期
我们先来看看Vue的生命周期,Vue 实例有一个完整的生命周期,也就是从开始创建、初始化数据、编译模版、挂载 Dom -> 渲染、更新 -> 渲染、卸载等一系列过程,我们称这是 Vue 的生命周期。
| 生命周期 | 描述 |
|---|---|
| beforeCreate | 组件实例被创建之初,组件的属性生效之前 |
| created | 组件实例已经完全创建,属性也绑定,但真实 dom 还没有生成,$el 还不可用 |
| beforeMount | 在挂载开始之前被调用:相关的 render 函数首次被调用 |
| mounted | el 被新创建的 vm.$el 替换,并挂载到实例上去之后调用该钩子 |
| beforeUpdate | 组件数据更新之前调用,发生在虚拟 DOM 打补丁之前 |
| updated | 组件数据更新之后 |
| activited | keep-alive 专属,组件被激活时调用 |
| deactivated | keep-alive 专属,组件被销毁时调用 |
| beforeDestory | 组件销毁前调用 |
| destoryed | 组件销毁后调用 |
图示: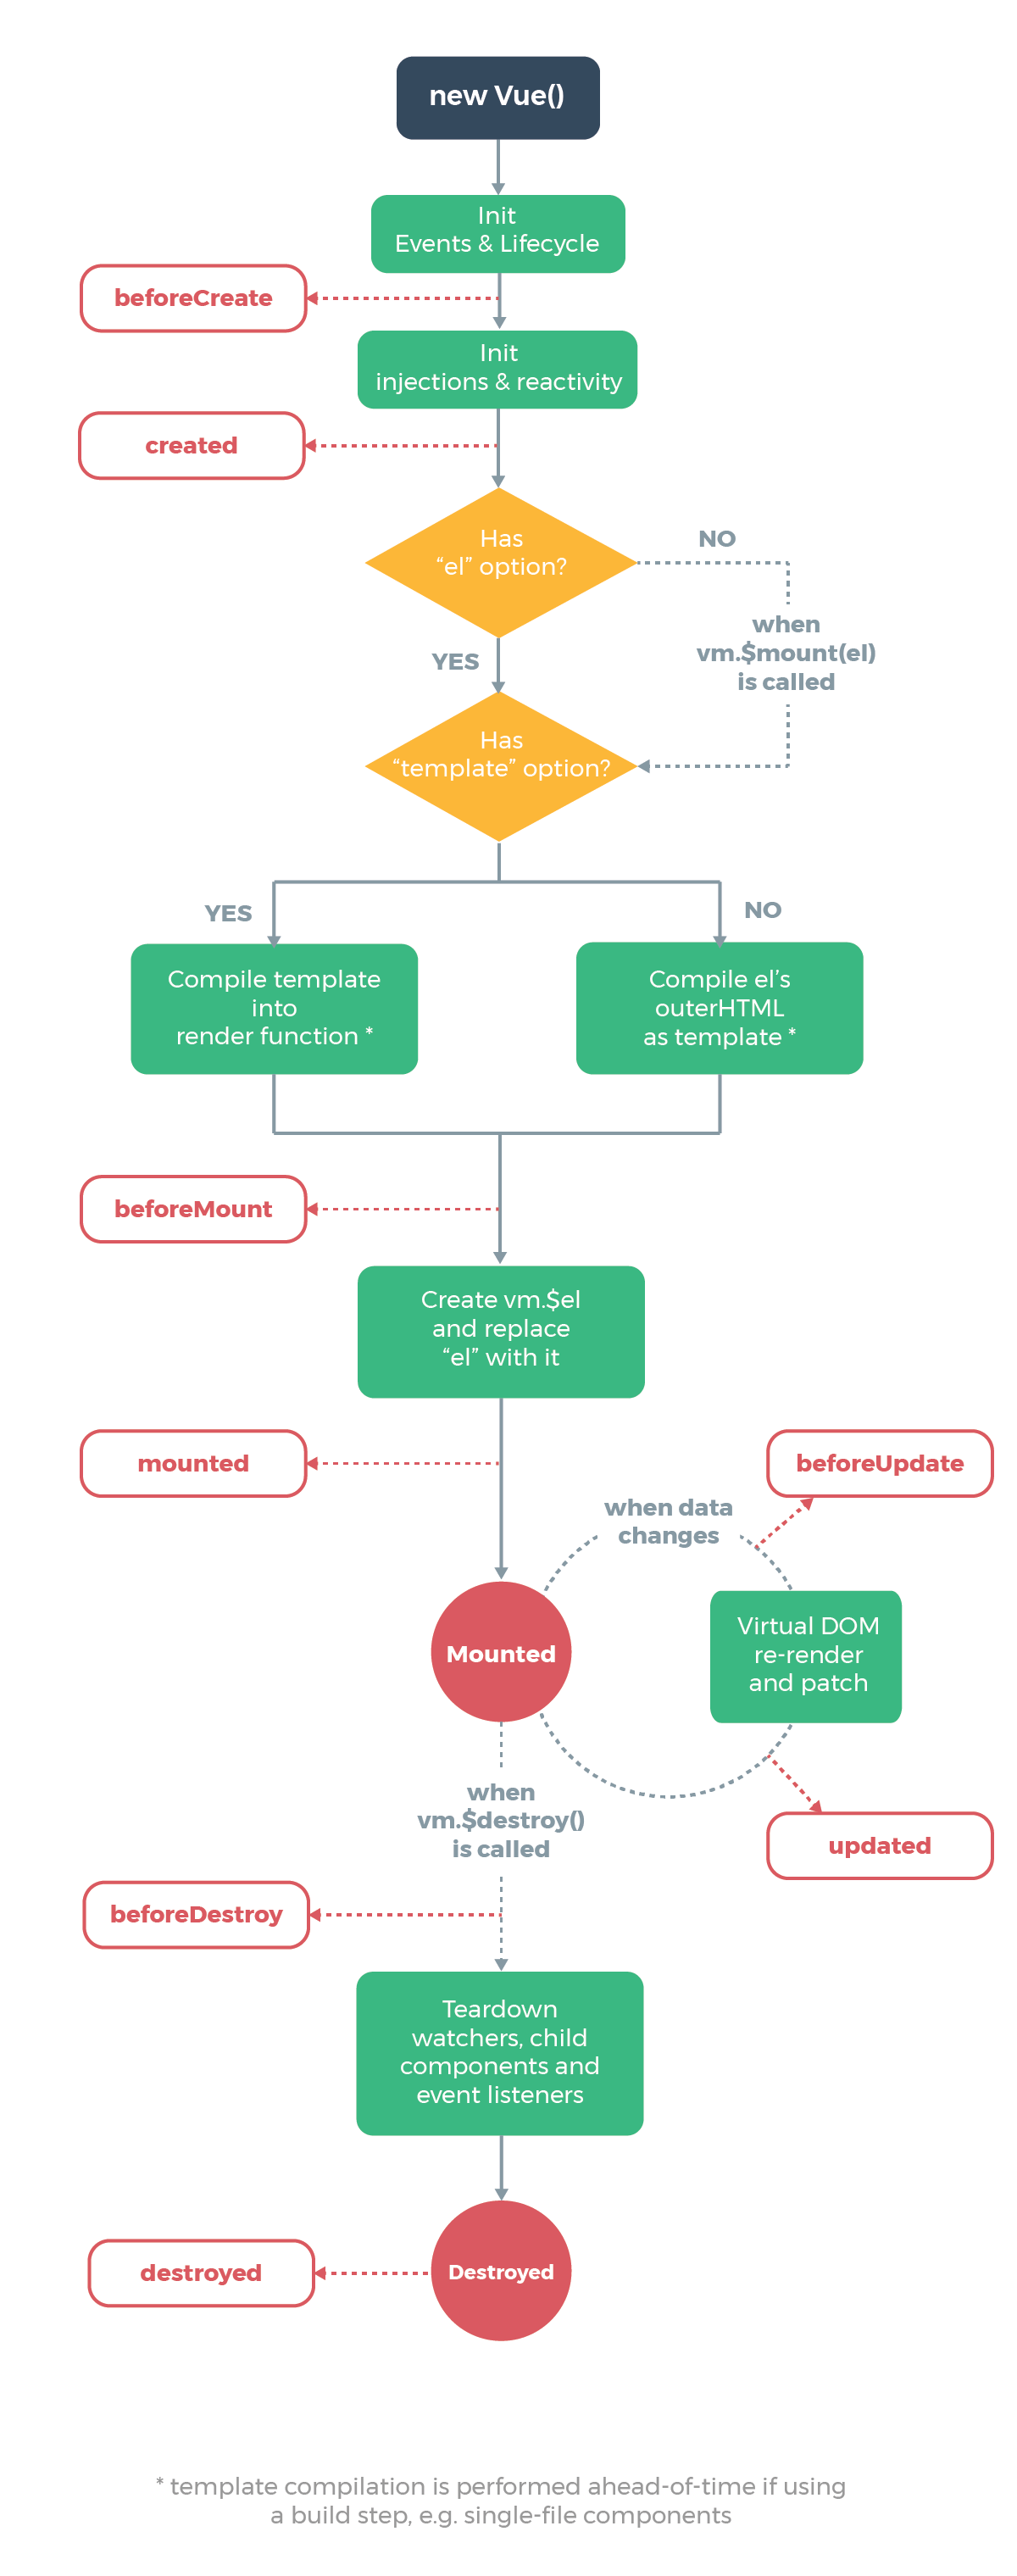
父子组件声明周期执行顺序
在单一组件中,挂载时钩子的执行顺序是beforeCreate-> created -> beforeMount -> mounted,但当父子组件嵌套时,父组件和子组件各拥有各自独立的钩子函数,这些父子组件的这些钩子是如何交融执行,且执行顺序又是怎样的呢?
我们先给出父子组件的代码;
<template>
  <div :style="{ backgroundColor: 'gray', padding: '10px'}">
    <p>ParentComp</p>
    <ChildComp />
  </div>
</template>

<script>
import ChildComp from './ChildComp.vue'
export default {
  components: {
    ChildComp
  },
  name: 'ParentComp',
  data() {
    return {
    }
  },
  methods: {
  },
  beforeCreate() {
    console.log(`ParentComp - beforeCreate - ${new Date().getTime()}`)
  },
  created() {
    console.log(`ParentComp - created - ${new Date().getTime()}`)
  },
  beforeMount() {
    console.log(`ParentComp - beforeMount - ${new Date().getTime()}`)
  },
  mounted() {
    console.log(`ParentComp - mounted - ${new Date().getTime()}`)
  },
  beforeUpdate() {
    console.log(`ParentComp - beforeUpdate - ${new Date().getTime()}`)
  },
  updated() {
    console.log(`ParentComp - updated - ${new Date().getTime()}`)
  },
  beforeDestroy() {
    console.log(`ParentComp - beforeDestroy - ${new Date().getTime()}`)
  },
  destroyed() {
    console.log(`ParentComp - destroyed - ${new Date().getTime()}`)
  }
}
</script>
<template>
  <div :style="{ backgroundColor: 'green'}">
    <p>ChildComp</p>
  </div>
</template>

<script>

export default {
  name: 'ChildComp',
  data() {
      return {
      }
  },
  methods: {
  },
  beforeCreate() {
    console.log(`ChildComp - beforeCreate - ${new Date().getTime()}`)
  },
  created() {
    console.log(`ChildComp - created - ${new Date().getTime()}`)
  },
  beforeMount() {
    console.log(`ChildComp - beforeMount - ${new Date().getTime()}`)
  },
  mounted() {
    console.log(`ChildComp - mounted - ${new Date().getTime()}`)
  },
  beforeUpdate() {
    console.log(`ChildComp - beforeUpdate - ${new Date().getTime()}`)
  },
  updated() {
    console.log(`ChildComp - updated - ${new Date().getTime()}`)
  },
  beforeDestroy() {
    console.log(`ChildComp - beforeDestroy - ${new Date().getTime()}`)
  },
  destroyed() {
    console.log(`ChildComp - destroyed - ${new Date().getTime()}`)
  }
}
</script>
加载渲染过程
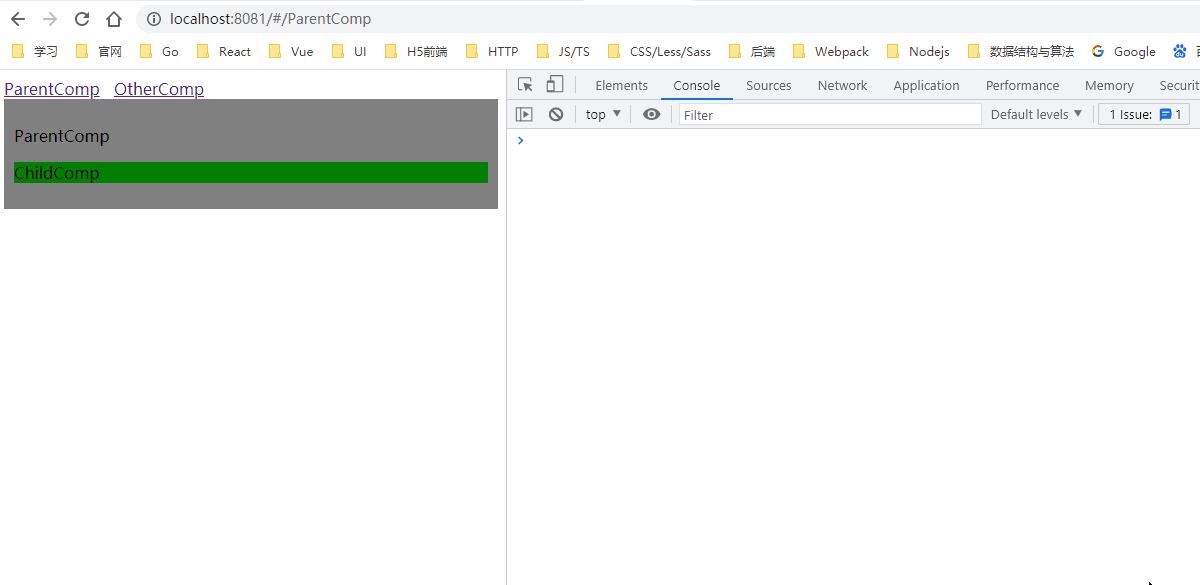
子组件挂载完成后,父组件还未挂载。所以组件数据回显的时候,在父组件mounted中获取api的数据,子组件的mounted是拿不到的。
ParentComp - beforeCreate - 1627923686788
ParentComp - created - 1627923686807
ParentComp - beforeMount - 1627923686808
ChildComp - beforeCreate - 1627923686810
ChildComp - created - 1627923686810
ChildComp - beforeMount - 1627923686811
ChildComp - mounted - 1627923686814
ParentComp - mounted - 1627923686815
更新过程
当数据发生更新的时候,组件会触发beforeUpdate和updated这两个钩子函数,下面我们来看看在父子组件中,这两个钩子的触发顺序是怎样的;
父子组件各自更新
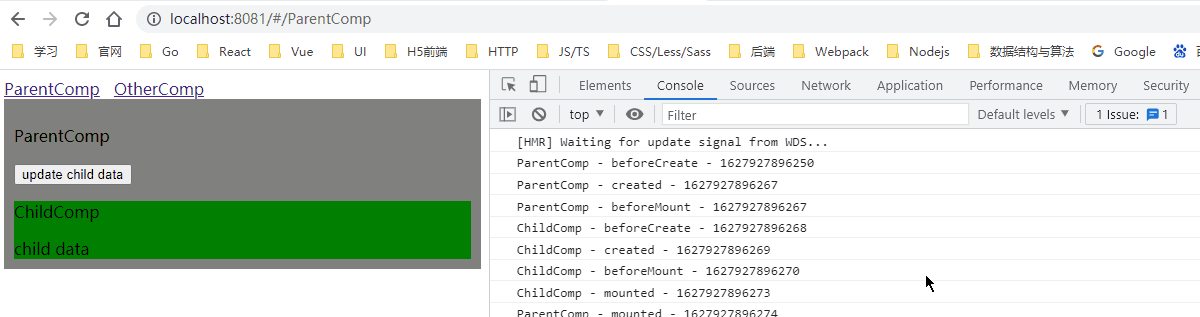
父子组件各自在自己组件内部更新自己的数据,此时都只会触发各自的钩子;
<template>
  <div :style="{ backgroundColor: 'gray', padding: '10px'}">
    <p>ParentComp</p>
    {{ parentData }}
    <button @click="updateParentData">update parent data</button>
    <ChildComp />
  </div>
</template>

<script>
import ChildComp from './ChildComp.vue'
export default {
  components: {
    ChildComp
  },
  name: 'ParentComp',
  data() {
    return {
      parentData: 'parentData'
    }
  },
  methods: {
    updateParentData() {
      this.parentData = 'new parentData'
    }
  },
  // 其余重复生命周期代码同上
}
</script>
<template>
  <div :style="{ backgroundColor: 'green'}">
    <p>ChildComp</p>
    {{childData}}
    <button @click="updateChildData">update child data</button>
  </div>
</template>

<script>

export default {
  name: 'ChildComp',
  data() {
      return {
        childData: 'childData'
      }
  },
  methods: {
    updateChildData() {
      this.childData = 'new childData'
    }
  },
  // 其余重复生命周期代码同上
}
</script>
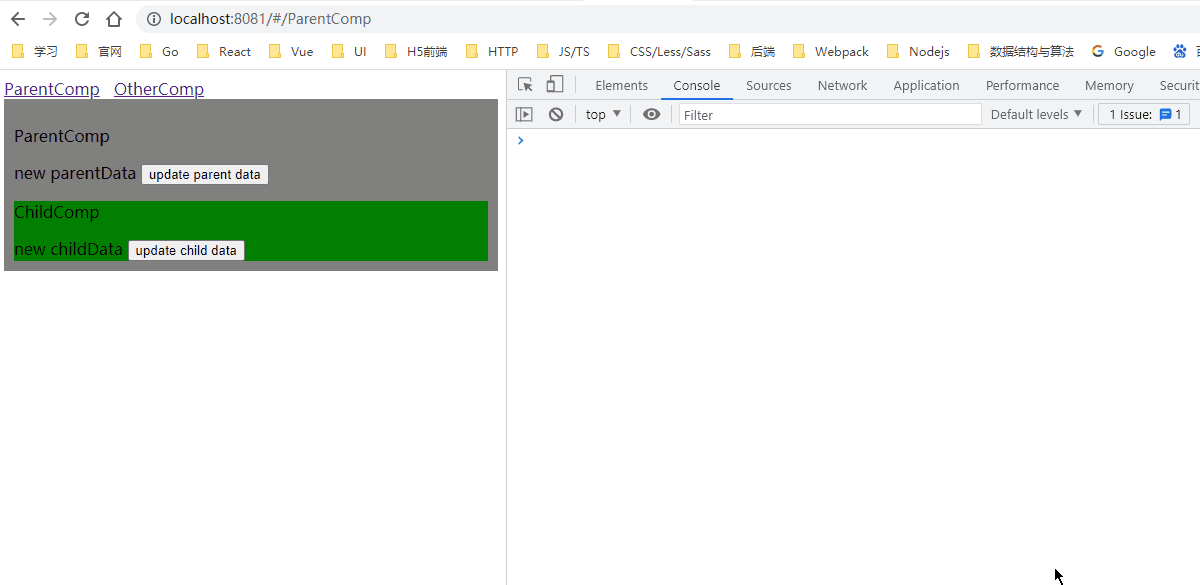
可以看到,父子组件各自更新,不会互相影响,只会触发自己的更新钩子
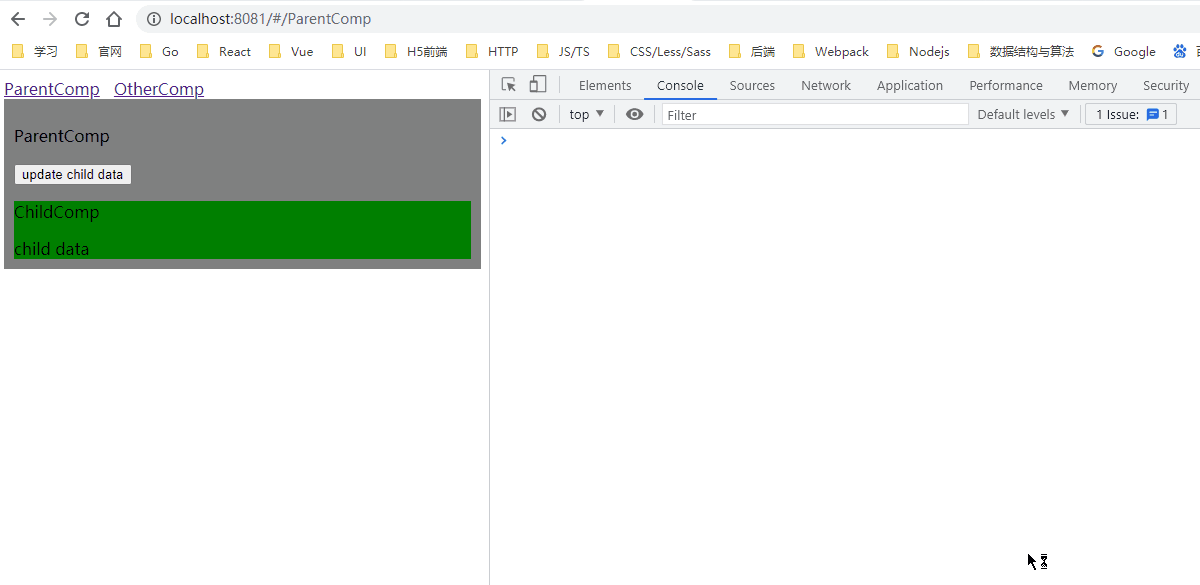
props更新
当使用props将数据传递给子组件的时候,由于父组件自身的数据发生了变化,因此会触发钩子函数,子组件虽然没有显示的修改数据,但是父组件穿过类的props数据发生了变化,此时子组件也会触发钩子函数,可以理解为子组件将父组件传过来的props作为了data里的数据,此时props变了,也会触发钩子,也可以看到模板里使用props的数据直接实用就好了,和data里声明的数据是同样的使用方式
<template>
  <div :style="{ backgroundColor: 'gray', padding: '10px'}">
    <p>ParentComp</p>
    <button @click="updatePropsData">update child props data</button>
    <ChildComp :childPropsData="childPropsData"/>
  </div>
</template>

<script>
import ChildComp from './ChildComp.vue'
export default {
  components: {
    ChildComp
  },
  name: 'ParentComp',
  data() {
    return {
      childPropsData: 'props data'
    }
  },
  methods: {
    updatePropsData() {
      this.childPropsData = 'new props data'
    }
  },
  // 其余重复生命周期代码同上
}
</script>
<template>
  <div :style="{ backgroundColor: 'green'}">
    <p>ChildComp</p>
    {{ childPropsData }}
  </div>
</template>

<script>

export default {
  name: 'ChildComp',
  props: ['childPropsData'],
  data() {
      return {
      }
  },
  methods: {
  },
  // 其余重复生命周期代码同上
}
</script>

可以看到,通过修改props来更新数据,会先触发父组件的beforeUpdate钩子,让后等到子组件更新完毕,再触发父组件的updated钩子
通过ref更新
我们再来看看直接通过ref更新子组件的数据,此时父组件是没有数据修改的,因此不会触发钩子,但是子组件的数据被父组件修改了,因此会触发钩子函数
<template>
  <div :style="{ backgroundColor: 'gray', padding: '10px'}">
    <p>ParentComp</p>
    <button @click="updateChildData">update child data</button>
    <ChildComp ref="childComp"/>
  </div>
</template>

<script>
import ChildComp from './ChildComp.vue'
export default {
  components: {
    ChildComp
  },
  name: 'ParentComp',
  data() {
    return {
    }
  },
  methods: {
    updateChildData() {
      this.$refs.childComp.childData = 'new child data'
    }
  },
  // 其余重复生命周期代码同上
}
</script>
<template>
  <div :style="{ backgroundColor: 'green'}">
    <p>ChildComp</p>
    {{ childData }}
  </div>
</template>

<script>

export default {
  name: 'ChildComp',
  data() {
      return {
        childData: 'child data'
      }
  },
  methods: {
  },
  // 其余重复生命周期代码同上
}
</script>
可以看到,通过ref去更新子组件的数据,也只会触发子组件的beforeUpdate和updated钩子;
销毁过程
父组件开始销毁,然后当子组件都销毁了之后,父组件才会执行destroyed钩子
ParentComp - beforeDestroy - 1627927903322
ChildComp - beforeDestroy - 1627927903322
ChildComp - destroyed - 1627927903323
ParentComp - destroyed - 1627927903323
异步引入组件
如果是异步引入组件,我们来看看有什么不同的地方;
我们只需要将引入子组件的方式修改成为异步的方式,例如:
<script>
// import ChildComp from './ChildComp.vue'
export default {
  components: {
    ChildComp: () => import('./ChildComp.vue')
  },
}
</script>
很明显的区别在于,异步引入组件,父组件是直接挂载完成的,mounted之后才去开始挂载子组件,此时我们不刷新页面,卸载组件后重新挂载,钩子函数的触发顺序又和之前一样了,因此,只有当第一次挂载组件的时候,才会等到父组件挂载完成之后再去挂载子组件,之后无论卸载重新挂载多少次,钩子的触发顺序和同步引入的方式就一致了

对于其他场景的钩子触发顺序,则都是一样的,只有在第一次挂载的时候有所差异;
转载请注明来源,欢迎对文章中的引用来源进行考证,欢迎指出任何有错误或不够清晰的表达。可以在下面评论区评论,也可以邮件至 289211569@qq.com